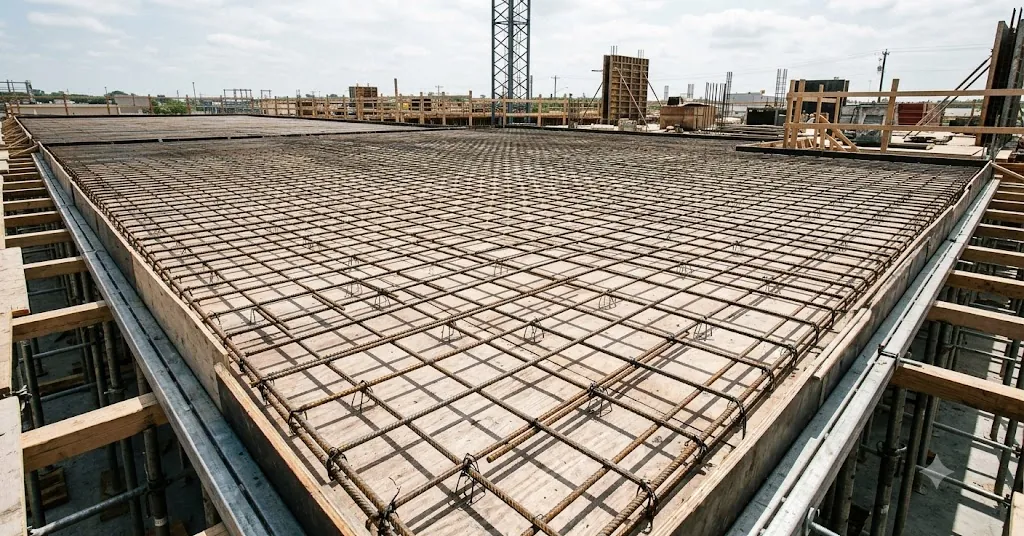
At Leeter, we manufacture and export wire, welded mesh, and the bar supports that hold reinforcement where the drawings say it should be. We have shipped to jobsites across North America and Europe since 2006, and the pours that go smoothly almost always share the same habit: a disciplined pre-pour walk. The pours that turn into repair tickets usually skipped one.
This guide gives you a practical checklist, explains why each item matters, and answers the questions crews ask most. It is written for site supervisors, concrete foremen, and inspectors who own the moment right before the pour.
Why the pre-pour window matters
Reinforcement that is misplaced by even a small margin changes how the finished slab or wall behaves under load. Cover that is too thin invites corrosion. Bars that sit too low do little to resist tension where the structure needs it. Once concrete cures, correcting any of this means demolition, not adjustment.
The pre-pour window is the last cheap moment in the whole sequence. A tie you add now costs seconds. The same fix after curing costs a saw, a crew, and a schedule slip. That asymmetry is the entire reason inspectors insist on signing off before any concrete is ordered.
There is also a documentation reason. Most project specifications require a reinforcement inspection to be recorded before the pour. A photo log and a signed checklist protect everyone if a question comes up months later. Treat the walk-through as both a quality gate and a record.
What size and spacing should you confirm first?
Start every concrete pour preparation walk by confirming bar size and spacing against the approved placement drawings, not memory. Field crews substitute bar diameters more often than anyone likes to admit, usually because a delivery was short. A #4 where the drawing calls for a #5 is a real capacity loss, and it is invisible once the forms are full.
Check spacing with a tape, not by eye. Reinforcement laid out by feel drifts, and the drift compounds across a large mat. Confirm that the center-to-center distance matches the schedule in both directions for a mat, and that top and bottom layers each carry the correct bar count. Where the drawing calls for additional bars around openings, columns, or edges, count them physically.
Bar identification matters too. Rolled marks on the bar tell you the grade and often the mill. If your specification calls for a specific grade, verify the marks match. Mixed grades in one element create behavior the designer never modeled.
- Confirm bar diameter against the schedule for every layer
- Measure spacing in both directions with a tape
- Count added bars at openings, corners, and column zones
- Read the rolled bar marks to confirm grade
- Flag any field substitution for the engineer before proceeding
Are the ties and supports holding everything in place?
Reinforcement must resist the force of wet concrete and the weight of workers without shifting, so ties and supports carry real structural responsibility during the pour. Loose or missing ties let bars roll and layers collapse together the moment the mix arrives. That is the failure mode that surprises new crews most.
Walk the mat and pull test the intersections. Tie wire should hold each crossing firmly enough that the bar does not slide by hand. You do not need every single intersection tied on a large mat, but you do need the pattern the specification requires, typically a staggered arrangement that keeps the grid square. Corners, laps, and perimeter bars deserve extra attention because they take the most abuse.
Supports keep the layers apart and off the ground. Confirm that rebar chairs are spaced closely enough that the bars do not sag between them. On soft subgrade, chairs need a wider base or a bearing plate so they do not punch into the ground under load. A chair that sinks defeats the cover it was placed to protect.
Check the tie pattern against the spec
Different elements call for different tie densities. A structural slab in a high-traffic pour needs more ties than a light housekeeping pad. Match what you see to what the drawing notes require, and add ties anywhere the mat feels springy underfoot.
Verify support type suits the surface
Plastic-tipped chairs suit exposed surfaces where a steel tip could bleed rust. On grade, a wider footprint prevents sinking. Choose the support to the condition, not just to what is in the gang box.
Is the concrete cover correct everywhere?
Concrete cover is the distance from the bar to the finished concrete surface, and it is the single biggest driver of long-term durability in reinforced concrete. Too little cover exposes steel to moisture and chloride, and corrosion follows. Too much cover moves the steel away from where it resists tension, weakening the element. Both errors are common and both are preventable at this stage.
Measure cover at the bottom, sides, and top of the element. The bottom cover depends entirely on chair height, so confirm chair heights match the drawing. Side cover depends on how close the outermost bars sit to the form face. Top cover on a slab depends on how the top mat is held down and whether foot traffic has pushed it lower.
Cover requirements vary by exposure. Elements against soil, in contact with water, or in de-icing environments carry larger cover values than interior members. Read the specific cover callout for each element rather than applying one number everywhere. When in doubt, the placement drawings and the governing building code control.
| Checkpoint | What to verify | Why it matters |
|---|---|---|
| Bottom cover | Chair height matches drawing | Protects bottom steel from ground moisture |
| Side cover | Outer bars set off the form face | Prevents edge spalling and rust staining |
| Top cover | Top mat held down, not walked flat | Keeps top steel from surface exposure |
| Exposure class | Correct cover value for the environment | Soil and water contact demand more cover |
Are the laps and splices the right length?
Lap splices transfer force from one bar to the next, so a lap that is too short creates a weak point exactly where continuity is required. Confirm that every lap length matches the schedule and that laps land where the drawing allows them, not wherever two bars happened to meet on delivery.
Check the direction of staggering too. Specifications usually require adjacent laps to be offset so that splices do not all stack in one plane. A row of aligned laps concentrates the splice zone and undermines the reason for lapping in the first place. Walk the lines and confirm the offset pattern.
Where mechanical couplers replace lap splices, confirm they are fully engaged and torqued per the manufacturer instruction. A partially threaded coupler looks connected but carries far less than its rating. This is another item that disappears the instant concrete covers it.
Have you capped exposed bar ends?
Every vertical or projecting bar end that a worker could fall onto needs a protective cap, and this is a life-safety item, not a finish detail. Impalement on unprotected reinforcement is a documented and serious construction hazard, which is why regulators require exposed ends to be guarded before crews work above or around them.
Fit rebar safety caps on all upward-projecting bars in the work area. For dowels that people might fall across, use caps rated to resist impalement rather than lightweight mushroom caps meant only to protect against scrapes. Confirm the cap type matches the fall exposure at that location.
Do this before the pour crew arrives, not during. Once concrete is flowing, workers move fast across the mat and near the forms. Caps already in place remove a hazard from the busiest, most distracted moment of the day.
The complete pre-pour reinforcement checklist
Run this list as a final walk with the drawings in hand. Sign and photograph it before ordering concrete.
- Bar size and grade match the schedule for every layer
- Spacing verified with a tape in both directions
- Added bars counted at openings, corners, and columns
- Ties present per the specified pattern and holding firm
- Supports spaced so bars do not sag; bases suit the subgrade
- Bottom, side, and top cover measured and correct
- Cover value matches the exposure class for each element
- Lap lengths correct and staggered per the drawing
- Couplers fully engaged and torqued where used
- Safety caps fitted on all exposed projecting bar ends
- Embeds, sleeves, and blockouts placed and secured
- Forms clean, braced, and free of debris and standing water
- Inspection recorded and signed off
How Leeter helps you get pour-ready
Reinforcement that stays where you placed it depends on the quality of the wire, mesh, and supports underneath it. Leeter manufactures welded wire mesh, tie wire, and bar supports built to hold position through the pour, and we ship to contractors and distributors across North America and Europe. If you are sizing chairs for a soft subgrade or matching caps to a fall exposure, we can help you specify the right part.
To discuss a project or check stock and lead times, request a quote and our team will follow up with options suited to your pour.
Frequently asked questions
How long before a pour should the reinforcement inspection happen?
Schedule the inspection close enough to the pour that nothing changes afterward, but with enough margin to fix problems. Many crews inspect the day before and do a short final walk the morning of the pour. The goal is that no one disturbs the mat between sign-off and concrete.
What is the most common reason a pre-pour inspection fails?
Insufficient or inconsistent concrete cover is one of the most frequent findings. It usually traces back to chairs that are the wrong height, spaced too far apart, or sinking into soft subgrade. Confirming chair height and support spacing early prevents most cover rejections.
Do I need to tie every bar intersection?
No. Most specifications require a staggered tie pattern rather than every intersection, because full tying is rarely necessary to hold position. Focus on the pattern the drawing calls for, and add ties at laps, corners, perimeter bars, and any spot where the mat feels loose underfoot.
Are rebar safety caps required by code?
Occupational safety regulations in North America and Europe generally require protection against impalement on exposed reinforcement where workers could fall onto it. Use caps rated for impalement resistance in fall-exposure zones rather than lightweight caps, and fit them before crews work near projecting bars.
What should I check about the formwork before the pour?
Confirm the forms are clean, tightly braced, and sealed at the joints, with no standing water or loose debris inside. Verify embeds, sleeves, and blockouts are placed and secured. Formwork that shifts or leaks during the pour can undo careful reinforcement placement in seconds.
Ready to line up supports, mesh, or safety caps for your next pour? Request a quote and we will help you get the reinforcement pour-ready.
